≡ Menu

Grandma is the Lesson

“How can you be so patient?” asked my son.

“Am I being patient?” I questioned.  If I am, it is a surprise to me, and I am glad of it!

My 80-year-old mother (who has Alzheimer’s) is living with us for awhile. And this morning, it dawned on me that Grandma is the lesson!

Years ago, I wrote an article entitled, The Baby IS the Lesson.  I had been blessed with a sudden perspective change during my years of homeschooling—with babies daily disrupting our fledging homeschool.  God opened my heart to realize that the most important thing my children were learning in our hours together in homeschool was how to value and treat each other, even a crying or mischievous little one!

And now we’ve come full circle.  My babies are all nearly grown.  Our homeschool has become quiet and orderly.  But Grandma forgets what day or month it is, and asks over and over and over. Her purse or glasses or sweater or teabags are the subject of frequent, frantic searches involving the whole family. She changes her mind often. Or forgets that she made it up at all. She needs help at inconvenient and disruptive times, sometimes in the middle of the night. She deserves to be treated with dignity and respect. And now, once again we are learning “the lesson”.

How we treat Grandma IS the lesson. I didn’t plan it, but it is just the right tutor for all of us. It teaches super-patience. Being kind. Holding your tongue. Accommodating. Caring. Serving. Loving. Giving. Selflessness . . .

We are enjoying Grandma so much!  She helps us not take ourselves too seriously. She eats dessert for breakfast. She is a widow, but counts her blessings and sees life from the bright side. She is a great sport, and game for everything—from wearing a cowboy hat and going to the rodeo— to swimming, dancing, or eating most anything!  Whatever she thinks pops right out of her mouth and she isn’t afraid of what people will think of her. She loves to talk to everyone who will listen, even strangers . . . and go anywhere at all, even on errands or grocery shopping. She sides with the little ones and sees life from their angle. She brings a nice balance to our family life, and so much wisdom from her life’s experiences. Her beliefs are different from ours, and it causes us each to examine and silently reaffirm our own faith while respecting her ideas. She was a social, mentally sharp, and spirited woman in her day, and her presence makes us soberly realize that we won’t live forever, or always be young and capable.  Now it the time to prepare to meet God, while our life is busy and we are strong and can serve and contribute in many ways.

Diplomas or degrees are great, and knowledge is a worthy goal, but compassionate living—valuing and respecting each child of God, no matter what age they are—that is the supreme lesson. For my children, I couldn’t wish for more than learning that precious lesson well.

{ 1 comment }

Family Stories: A Meaningful Writing Project

Kids love to hear family stories over and over again, don’t they, though?  And every family has their own heritage of stories!

Some years ago, we idealistically bought a milk cow in an effort to improve our children’s health. We come from the city so caring for an animal, plus milking, was all new to us, and very foreign territory that took a great deal of time to get used to.  My good husband learned to milk, and milked that cow morning and night, with one of our sons in turn as a milking partner. It was a time-consuming job that made their hands ache.  My daughter Emily (9) was a happy little milkmaid and her older brothers would do all manner of job-trading and enticing to get her to milk in their place!  Since having a milk cow was not something we were accustomed to, the milking was slow-going. If the cow kicked over the bucket with even a little milk in in— it was very disastrous!

Well, one Sunday morning, the refrigerator was full to the brim with milk pitchers when Daddy opened the door.  He was freshly dressed in his nice dark suit, all ready for church. Suddenly, the gallon milk pitcher slipped out of his hands, bouncing and exploding onto the kitchen floor.  Whole milk is pretty creamy and slippery, and soon he was slipping and sliding, and the milk was gushing under the fridge.  What a clean-up ordeal! Attempting to keep his balance, Daddy grasped the nearest object, which turned out to be another pitcher, dumping a second gallon of milk on the kitchen floor, and all over his suit!  The saying, “Don’t cry over spilled milk” took on new meaning for all of us that morning!

My friend Allaire has a great idea for getting her kids to write in her homeschool.  Each week, the children get to pick a favorite family story.  One of the parents retells it and then the children all write the story in their own words, in first person. The author signs their name to the story. It’s helpful to document who told them the story too. These stories can be illustrated with your children’s drawings of the event, or add original photographs if you have them.  Unfortunately, in our haste to clean up the enormous milk spill before church, we didn’t snap any pictures, as is often the case in such mishaps.  Thank goodness that crisis + time = humor!

At the end of the school year, these wonderful stories can be bound into a book which can be a family history record of the highlights of family stories. What a meaningful way to get children to write.  What a treasure to read and re-read, for generations to come!


{ 0 comments }

Comfort Side Dish from the Garden

Here’s yet another way to use that zucchini and yellow squash, plus garden greens and herbs.  My daughter-in-law Melissa, who is a great cook, gave me the idea.  It is amazing how the squash sort of disappears or blends in and nobody is the wiser.  Really, really delicious comfort food!

Comfort Side Dish

  • 2 red potatoes, cut in half lengthwise, and sliced thinly
  • 1 onion, cut in half, and sliced thinly
  • 1 medium yellow squash, cut in half lengthwise, and sliced thinly
  • 1 medium zucchini, cut in half lengthwise, and sliced thinly
  • 1/2 cup mushrooms, sliced
  • 1 teaspoon garlic powder
  • 2 tablespoons minced fresh parsley or 1/2 teaspoon dried parsley leaves
  • 2 tablespoons minced fresh oregano or 1/2 teaspoon dried oregano leaves
  • 2 tablespoons minced fresh basil or 1/2 teaspoon dried basil leaves
  • 1/2 cup minced fresh kale or 3 tablespoons dried kale leaves (optional)
  • 3 tablespoons olive oil
  • salt and freshly ground pepper

Put oil in a wok or large skillet, adding veggies as you slice them, beginning with the potatoes and onions (that take longest to cook).  Add herbs and cook over high heat, tossing to prevent sticking, until everything is coated well.  Cover and cook over medium heat for 15-20 minutes, or until potatoes are tender.  Season well with salt and pepper. Serves 4.

Makes a delicious side dish that everyone loves.  Add sliced cooked sausage or bratwurst for a hearty meal.


{ 0 comments }

Trouble Getting Going?

Back-to-school is here! Kind of hard to get in the mood, huh? If you are having a hard time jump-starting homeschool, maybe some of these ideas will help:

1) Wait for Pencil Weather

In my part of the country, it is 90 degrees during the daytime right now.  It is not exactly ideal study weather.  I have a friend who does not begin her homeschool until “Pencil Weather” arrives. You know—that crisp, crunchy leaves, bright blue sky, wear-a-sweater weather that makes you itch to get out a workbook and have at it.  Maybe it is a good idea to swim and bike and picnic and hike and canoe and garden and jump on the trampoline and dig in the dirt and build a playfort and lay on the grass and look at the clouds—while you have a chance.  There will be plenty of bad weather days to study, study, study!  Our bad weather days this past spring elongated into the early summer, in fact. So dont’ rush the good weather away or opt for staying inside while the sun shines so invitingly!

2) Don’t Go Cold Turkey

Cold turkey is difficult. How about easing into studying slowly?  Same way as you get into cold water.  Start with the oldest child and assign one chapter of a great adventure book, to be read by lunchtime each weekday. Discuss the chapter briefly at lunch, having your oldest tell the younger ones what happened in the story that day. Get on the internet and google search a chapter summary and thought questions so you can ask something intelligent.  Or better yet, read it yourself so you can discuss it with your student.  After a week of daily reading, it isn’t very hard to get the rest of the kids that can read to join in the daily chapter reading.  Or to add a page of math facts to their daily “to do’s”.  Take it little by little and  you’ll be up to speed with all the kids within a few weeks!

3) Mount an Advertising Campaign

If it didn’t work, big companies wouldn’t do it. Pick a wall or bulletin board area to post your ads on.  I use the inside of my front door because my children all end up looking at it several times a day.  The wall in the most-used bathroom works great too.

Start by posting a notice about something fun:  Zoo Field Trip coming up a week from Tuesday! After a day or two, take that down and stick up a few pictures of animals, and let the suspense build. (What’s Mom up to?) Now post a flyer with a list of animals asking each child to pick an animal to look up and learn about it.  Tell them their chance to report will be coming soon. Pile some library books or books you own about animals in a reading basket and put it in the middle of the living area.  Next ad: post a notice that everyone is supposed to draw a picture (or print off pictures) of their chosen animal.  Next day, it’s time to advertise the upcoming event:  “On Friday morning, we’ll be having our oral Animal Reports complete with pictures!”  If you have older children, ask them to write up their report also.  Once kids get in the mode of learning, they enjoy it and are much happier putting in the time.

4) Work on Relationships

Sometimes it is hard to get going on homeschooling because you have one child (or more)  that has a grudge and doesn’t cooperate.  The best way to dissolve those resistant feelings is to work on the relationship rather than the schoolwork.  Take that child with you alone to do an errand and buy him a treat.  Ask his opinion on how you should do something, or what would work to help the younger children.  Take the time to lay next to him at bedtime and just listen to him talk, focusing on learning about him rather than teaching him.  My favorite activity is to go swimming with that child.  Swimming provides lots of fun, confiding and talk without much effort. When the relationship is healthy and vibrant, children more eagerly cooperate with you and please you.

5) Get Yourself in Order

Another impediment is that we moms are scattered and unorganized in our own daily work.  Start with a simple Daily Do’s chart.  For myself, I limit it to about 5 basic things on it that I need to accomplish that day:  laundry, meal prep, breakfast dishes, etc.

Make it simple. Make it doable. And start making it happen.  Stick the chart up where your kids can see it and mark it every day.  You’ll fail some of the time.  But they see you trying everyday. Order is catching.

Once you’ve been at it for a week, and the kids see you are seriously working on it, it is time for them to make their Daily Do’s for School! Start with the most important subjects. Make it short, simple and doable. Make it possible for them to be finished by lunchtime. Resist the urge to put all subjects on it. You can always add a subject later when they are more accustomed to the “bridle”. Just take care not to overload, which can turn school from fun into drudgery.

For a 5 year old, their school chart might look like this:

Daily Do’s

  • Math
  • Phonics
  • Journal writing
  • Subject of the Day

I make a check-off chart  that is posted on the wall, that they can mark daily, and I can see at a glance. You can always do more in your homeschool, like present an art project, but having the basics on a chart makes sure that the minimum always gets done whether Mom is feeling creative or not.


Ready or not, most of the US is back in school.  Prayerfully decide your strategy for getting going, and I wish you a great school year!


You might enjoy:


Student Planner


Huck Finn + Study Guide


Mr. Popper’s Penquins

{ 0 comments }

Sun-dried Tomatoes, the Easy Way

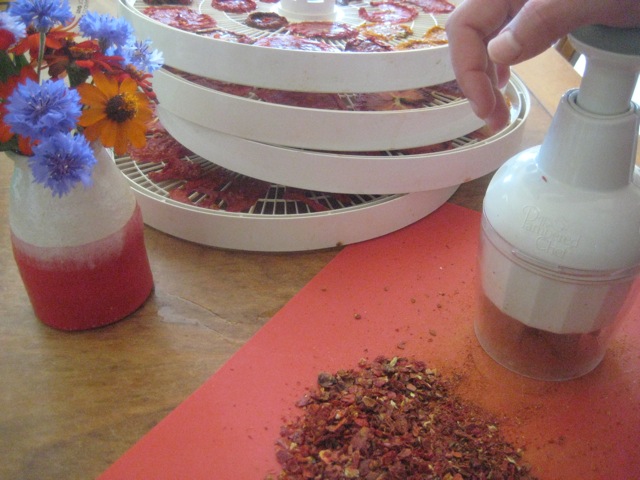
Truly a gourmet ingredient of Italian cooking, “sun-dried” tomatoes are pricey—$5 for a little 3 ounce pouch—but easy to make yourself for free, if you have a garden! Almost no sun-dried tomatoes are actually sun-dried anymore as that process takes a couple of weeks, depends on hot, dry weather, and attracts insects.  Here’s how to make the same great-tasting nutritious dried tomatoes the quick and easy way, in your food dryer:

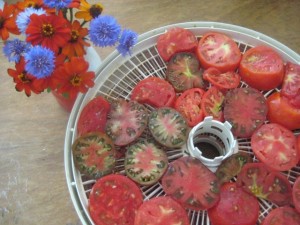
1. Wash garden tomatoes and slice thickly, arranging them on dryer trays.  Roma tomatoes will dry the fastest, but any tomato will work fine, even cherry tomatoes (just slice in half).  Resist the temptation to slice the tomatoes thinner than 1/2″ to 3/4″. They may dry faster, but you may end up struggling to remove them from the dryer trays if they are too thin.  A thicker tomato slice will pop off easily.

2.  Dry at 135 degrees (or medium high setting on your food dryer) for approximately 30-40 hours, until tomato slices are very dry, or leathery feeling. I don’t worry about the time very much.  Just check them before you go to bed and when you get up in the morning, and they’ll be dry before you know it!

3.  Open dryer and separate trays, allowing the tomatoes to cool for 15-30 minutes.If you leave them for hours, they will begin to gather the humidity from the air and become less dry.

4. Chop with a hand food chopper, or process lightly in food processor until just chopped.

5.  Store in airtight container, labeled.

Hooray!  All that summer goodness is easily tucked away nice and neat without the labor of canning!

Here’s how to use all that delicious summer bounty in the winter months ahead:

  • sprinkle on pizza after the sauce and before the cheese.
  • shake into casseroles
  • add a scoopful to meatloaf
  • add to soup liquid for a tomato based soup
  • add to boiling water for use the same as diced tomatoes in cooking. Makes a rich, delicious spaghetti sauce!
  • add to homemade salad dressing
  • put in the blender with dry milk powder, cornstarch, water and basil to make gourmet tomato soup.  Simmer until thick and creamy.
  • add to alfredo or garlic sauce in pasta dishes to add color and a burst of flavor
  • add 2 tablespoons to your cornbread recipe
  • make a delicious, colorful dip or spread by putting in the blender:  1 cup reconstituted sun-dried tomatoes, 1/2 cup walnuts, 2 tablespoons onion, 1/4 cup olive oil and a splash of vinegar.  Add a little water to get the right consistency.  Yum!  Fabulous spread on artisan bread!

Whenever using dried tomatoes in a dish that you will not be cooking, reconstitute them first by covering them in warm water (or broth or other liquid) and let them set for 30 minutes.  They will now be soft and ready to use raw. Don’t throw away the liquid, as it is nutritious and flavorful!

If you are wishing for oil packed sun-dried tomatoes, simply put your whole dried tomato slices into a wide-mouthed jar, layering them with fresh basil leaves, salt and minced garlic. When the jar is packed and compressed down, add olive oil to cover tomatoes. Store in fridge, and wait for 8 days until the tomatoes have softened before using. This make a delicious condiment!  When the tomatoes are gone, use the oil for cooking.

If you are using dried tomatoes in a dish that will be cooked, just toss them in dry, and they will soften as they cook.  Because they will soak up some water, they are great for thickening a sauce that is too watery.

Drying tomatoes is so easy that even your kids can do it, slicing and loading the trays, checking them for dryness, chopping, bottling and labeling them.  It really is quick and easy!

I love how compact dried tomatoes are!  A whole bushel of ripe garden tomatoes can be stored in just one quart jar once dried.  And they store wonderfully on your shelf for years so you can enjoy summer’s healthy, fresh taste in your meals, even in the middle of winter.

Now you know what to do with all those tomatoes!


P.S. Learn how to make V8 Powder from your garden veggies!


May I recommend my favorite food dryer:


{ 0 comments }

Square Foot Garden, My Third Year


Gardening . . . I think it is my favorite hobby.  I wish summer could last forever!

This year is my third year of Square Foot Gardening.  I just like it better and better!  The key to a great Square Foot Garden is putting out the initial investment in the special soil required.  You can’t just do it in your regular old garden dirt and get the fabulous results.  You have to create a blend of vermiculite, peat moss and several types of compost (described in detail in the book, Square Foot Gardening) to get the nutrient-rich soil that produces high yields.

My favorite part of Square Foot Gardening is that I don’t need tools anymore:  no shovel, pitchfork, or rake. No sore back.  Carrots can be wiggled out of the ground easily with your finger.  No, my favorite thing is that nothing “gets lost” anymore, it is so organized and compact.  And even the tiny seeds germinate so I am growing all my own fresh herbs as a result. Or maybe my favorite part is that you never walk on—or water or amend—all that space between plants.  Instead the good stuff and water goes in the boxes along with all the plants, and you walk on the walkways around the boxes, resulting in a huge reduction—or extinction—of weeds!  Weeds don’t really stand a chance. There is simply no room for them!

Hang on tight, watermelons!

This year, I planted half of my garden in Square Foot boxes, and I seriously ran out of vegetables and flowers to grow before I ran out of space.   The author of Square Foot Gardening claims you grow twice the food in half the space, conserving water by 80%.  I have been gardening for 40 years, but this is the most fun and success I’ve ever had gardening.  No more rows!

The other half of my garden, I covered with black plastic in anticipation of all those big sprawling plants that take so much room.  Last autumn, my husband loaded this area up with all the bags of fall leaves the neighbors were setting out for the garbage man, plus he cleaned out the chicken coop and dug it in.  In about March, we spread a big sheet of cheap black plastic (3 mil) over the entire area, laying carpet strips down every 4 feet to serve as walkways.  We did it early to heat up the ground quicker.  Then we cut an “X” in the black plastic and  insert the seedlings we had started earlier indoors.

In each 4 foot wide bed, we put posts in at each end and put up some flexible wire support or netting with big openings, so vines could grow up it.  Normally the melons, cantaloupes, squash and other big sprawling plants overtake the beds they were planted in, and by mid-summer, I can’t locate a path to walk on anymore. So this year, I decided everything was going to have to grow UP! This takes a bit of training, directing the growing vines through the wire fencing.  But it leaves the pathways open and makes it all so neat and compact!  What surprised me, though, was to see huge Sugar Baby watermelons hanging along the fencing, 3 feet off the ground.  I sort of hold my breath when I walk by them, hoping they won’t let go and splat to the ground!

Purple-and-white-striped Fairy Tale eggplant

Even yellow squash is growing up, up, up the fence, with a little prodding from me.  It really saves so much space, and keeps the melons from getting soggy or bug-eaten on the bottom, too!  My tomatoes are tucked in the fence on their row. Cucumbers grow straighter and are easier to find on a fence. So growing “up” has really worked well to keep the vine crops neater and more manageable.  The black plastic heats the ground for earlier yields and weeds can’t grow in black plastic, yay!

This year I tried some new varieties for fun!  I mixed a few “Carnival Morning Glory” seeds with my pole beans to show off their big striped blossoms.  I also planted “Fairy Tale” eggplants—very unique and prolific!

I tried mixing flowers and veggies this year, and it really makes the garden so much more delightful! In one Square Foot bed (4 feet x 4 feet), you have 16 square foot planting areas.  That’s a lot!  16 different crops can go in just one box!  So, I planted two or three squares of flowers intermingled with my vegetable crops in each box.  I put the trailing flowers on the outer edges of the box so they could drape over the edge. And I put the tall cosmos, zinnias or marigolds in the center squares so their height would not block access to the other crops.  Having lots of flowers is wonderful!  I keep them on my table and give them for gifts.

I love summer and I would be completely content to eat garden-fresh food all year round.  While the growing season is here, enjoy the beauty, the taste, and the nutrition— to the fullest!

Orange zinnias grow alongside dill, carrots, basil and tomatillos


You might enjoy:


Read my posts on having an easy garden!

A New Way to Garden

Carrots?  Really!

Second Year: Square Foot Gardening

How Does My Garden Grow?

Garden Fever

Painless Potatoes

{ 0 comments }

Garden Skillet Dinner

Yum! You can even see my heirloom "purple" tomatoes!

I am loving being able to harvest an overflowing garden basket every morning when I go out to my garden.  This is the very best time of the year for healthy, gourmet eating!  So tonight for dinner, Louisa and I put our harvest in a skillet and came up with a delicious garden-fresh dinner fit for a king!

Garden Skillet Dinner

  • 1 gigantic zucchini, cubed (about 6 cups)
  • 1/2 eggplant, cubed
  • 3 Anaheim peppers (mildly hot), sliced  (can substitute other peppers: bell peppers or 1 hot pepper)
  • 1 clove garlic, minced
  • 1/2 onion, chopped
  • 3 tablespoons fresh oregano, minced (or 2 teaspoons dry oregano leaves)
  • 3 cups cooked brown rice or quinoa
  • Optional:  2 cups cubed cooked chicken or cooked ground beef
  • 6 large garden tomatoes, chopped
  • 1 cup sour cream or plain yogurt
  • 1-2 cups grated cheese

1. Put veggies, garlic and oregano leaves in a large skillet.  Cover and cook over medium low heat (no need to add water or oil).

2. When veggies are tender, stir in rice and meat.  Heat through.

3.  Spread tomatoes over the top of the contents of the skillet.

4.  Stir 1 teaspoon powdered oregano, salt and pepper into sour cream and dollop on top of tomatoes.

5.  Sprinkle grated cheese over all.

6.  Cover and heat over medium low heat just until cheese is melted.  Tomatoes will be warm but not cooked.

This recipe could easily be modified to use whatever your garden is producing. I like to have cooked grain like rice or quinoa in my fridge so I can make a quick meal.  This only takes 30 minutes, start to table.  Serves 6.

The gourmet, unique flavored “sauce” comes from the mix of the juice of the veggies with oregano and sour cream.

Extra delicious!


You might enjoy:


{ 0 comments }

Say Yes!


Why not say "yes!"?

Have you ever seen (or been) an exuberant child with big dreams of building a play fort approach a parent who is quick to say “no” and watch the enthusiasm squelched right of that little guy?  A 6-year-old does not grasp the explanation of why not— of the neighborhood community rules or how you can’t afford the wood for the project.  A 6-year-old just yearns for a “yes!”—any “yes”—and someone to share his dream with, on whatever scale “yes” is possible.

I think sometimes parents borrow strength to feel more in control by exercising their power to say “no”. The parent who can say, “yes . . .  and I’ll help you” always wields the greater influence.

Everybody likes “yes”.  Why not say it whenever you can?  It makes you a happier, more fun parent.  It makes your kids more content. It allows them to dream and hope and not feel limited!  It opens doors for them, and widens their trust, feeling that you will help them realize their heart’s desires. And it amazes me that almost every request—even outlandish, dangerous ones—can be met with a positive response!

For example:

“Mom, can we go swimming?”

“Yes!  That sounds so fun!  Shall we plan it for Friday when our cousins come?”

“Mom, can I start a fire?”

“Yes!  Let’s get the dishes finished now, and then when Daddy comes home, we can roast marshmallows over a fire after dinner.”

“Mom, can I have a tiger?

“Yes!  You can draw one and give it a name and then let’s look up all about tigers and where they live on the internet and see if one would like to move into our backyard.”

It’s all in how you approach it.

I would always rather get a “yes” answer, and so would you.  Let’s give them to our kids just as often as we possibly can!


{ 0 comments }

Garden Cake

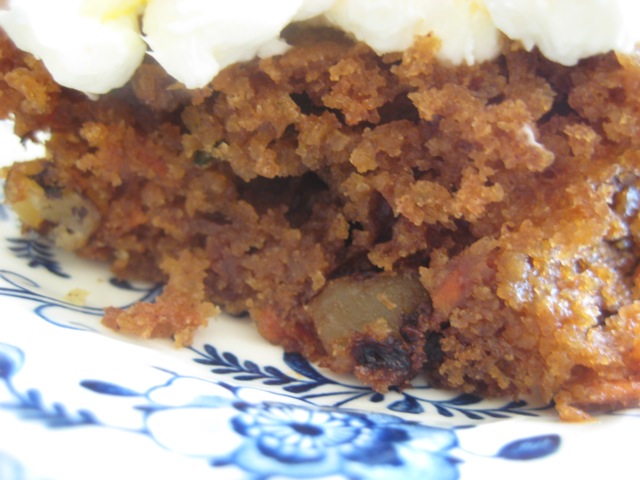
It’s summer and my garden is producing lots of zucchini, squash and carrots . . . time to stir all that goodness into a moist and delicious cake our families will love!  Sugar free, naturally.

Garden Cake

  • 2 cups whole wheat flour, freshly ground
  • 2 teaspoons baking soda
  • 2 teaspoon cinnamon
  • 1/2 teaspoon salt
  • 1/2 cup oil (olive or coconut) or softened butter
  • 3/4 cup unsweetened applesauce
  • 2 teaspoons vanilla
  • 3/4 cup honey
  • 3 eggs
  • 3 cups total: grated carrots, yellow squash,  zucchini
  • 1/2 cup raisins
  • 1/2 cup walnut halves and piece (I like to leave them big)

In a large bowl, mix dry ingredients.  Make a hole in the center and add the wet ingredients, mixing well.  Stir in raisins and nuts. Pour into a 9 x 13″ baking dish and bake for 40 minutes at 350°.


Cream Cheese Frosting

  • 12 ounce tub of plain unsweetened “whipped” cream cheese
  • 6 drops liquid stevia or 1/4 cup honey, adding more to desired sweetness
  • 3 tablespoons softened butter

Open lid on whipped cream cheese and add sweetener and butter.  Stir to mix in completely.  Taste and adjust sweetening as desired. Spread on cooled cake, garnish with chopped walnuts.  Store in fridge.


Wholesome and sweet!

{ 0 comments }

The Wrong Time to Train

Hiking together is a great time for talking and teaching!

Spilled milk.  Tantrums. Muddy footprints. Kids squabbling. Neglected chores. Disrespectful attitudes. Blatant disobedience.

Our children can exasperate us.

You’ve hear the adage about counting to ten before opening your mouth when your temper flares.  It is good advice!  Words spoken in anger don’t do much good. And they often do harm, poisoning the relationship.

“I told you that would happen!”

“If I’ve told you once, I’ve told you a thousand times!”

“You know better.”

Of course, you must stop bad behavior. But this is the wrong time to teach. The perfect time to train—and to teach in a way that will influence behavior—is not in the heat of the moment.  Never. Defenses are up.  Nerves are frayed.  Things are out of control. Words spoken when emotions are high are seldom the right words. And yet we have so much fire that it seems like it is the only moment, that if we don’t drive the point home with force, the lesson will never be learned!  We want to see justice done!  We want to unleash that ranting, raving, scolding lecture!  For their own good!

It has helped me to take a deep breath, hold my tongue, and talk to myself silently inside my head words such as these:  “I will remember this. There is enough time. I will seek out the right teaching moment, and then this wrong will be made right.  I will correct this!  This will not be forgotten. I will give my child the best conditions to learn this lesson.” Those words comfort me and calm me down.  They allow the flared ire to settle down. They allow me to formulate a plan.  I even jot myself a note to keep me tuned in to the need for training.

And when is the perfect time to train?  When things are peaceful, and children are happy.  That is when a story has great power.  That’s when your own life’s experiences, shared in a friendly manner, can teach and train in a big way!  I think I’ve taught my best lessons in the swimming pool or on walks. Working side by side on a project is an ideal time to discuss life.  Don’t get preachy.  Be brief and positive, assuring your child that you know they want to do well, and that you are not perfect but we all want to “try our best”. In a spirit of goodwill, your words go deeper.  Hearts are softer, more welcoming to teaching.  There are no walls up.  You can point out the right way to behave without treading on the self-worth of your child.  You can bear your own witness and it will be heard.

I love the scriptures for their great power of teaching through stories.  And don’t we love great books for that same gift, to learn through the actions of another?  How influential it is to see the dreadful results of bad choices in the life of a story character! When my children were young, we read the book Pinocchio (the original, not Disney).  My children were distressed that this little wooden boy made so many foolish decisions and got into such mischief!  They would moan out loud whenever they could see another mishap brewing. What an effective way to teach!

Family Night is a great time to have a lesson or game that drives home a valuable teaching, without condemning anyone.  Any goal can be turned into a game!  My son played a game with his little ones, where they could progress one space closer to an ice cream cone reward on a hand-drawn game board every time they went 15 minutes without crying. Teach them correct principles and make it fun to obey!

Bedtime is a very influential time for training.  Laying next to a child in the dark, it is possible to teach meaningful lessons. Their bodies are tired and their hearts are often wide open.  I would ask my child to tell me the best thing that happened that day, and then the worst.  Sometimes I would ask, “How do you wish you’d done it?”  Often this little connection was enough to spur some reflection and help a child see a better way.

Next time you feel your blood starting to boil for something your child has done, zip your mouth shut and talk to yourself. This is not the time for training.  There will be a right time to teach him to do better, when his heart is open and tender. Take the energy of anger and transform it into the energy of creativity to plan a lesson to teach your children worthy values to live by!  Those lessons will never be forgotten. As my grown daughter Emily says— when trying to make a decision on how to act— “I can hear your voice in my head, Mom.”


Coming soon . . . Obedience Stories!

{ 0 comments }