≡ Menu

6 Things to Never Do in Your Homeschool

learn-2387228_1280It’s that time of year again…and more and more mothers are opting to homeschool their children.  That should be easy enough…you’ve known these kids since birth, after all, and love them ferociously!  Here are 6 “nevers” to keep in mind to keep your homeschool on track.

#1   Never….flow with whatever’s going on
 
You’ve got to carve out some uninterrupted time if you are going to add one more job to your already busy life.  That means during homeschool it is a good idea to never
  • Talk or text on the phone
  • Schedule appointments
  • Invite people who ring your doorbell inside for a chat
Just focus. 
It’s only a few hours of concentrated time spent teaching your children.  Focus and enjoy.  Everything (…well, almost everything) can wait until you are done.  I like to do my teaching and supervising homeschool until noon—no longer.  And most things can wait until noon.
While we all have our different styles of homeschooling, if you are preoccupied, it’s pretty difficult to hone in on educating the kids.  That sends a statement to them…generally about the unimportance of education.
#2  Never…miss an opportunity to follow your child’s interest
 
If your daughter loves horses, use the subject of horses to capture her interest and spur on her delight in learning.  Reading, research, book reports and writing assignments can just as easily be assigned with “horses” as the topic, than anything else.  Whatever your child’s interest, you can use it to motivate and make doing schoolwork fun!
 
#3  Never…skimp on homeschooling supplies
 
It seems sensible to use old books, and cut corners when it comes to spending money on homeschooling.  I mean, really, how often are you going to need a math compass, afterall? The fact is, without a compass, you can’t do the problems in the geometry book.  Buy homeschool supplies like you buy oil for your car. Essential.
#4  Never….put off your least favorite subject
 
It’s human nature.  We leave the least enjoyable until last…which is why math came first in my homeschool day!  Might as well dive right in and get ‘er done.
The alternative?  You simply never get math 100% done, which means your kids are consistently behind when summer vacation ends each year.
#5  Never…miss a chance read aloud to your kids
 
Everyone loves a good story, and it bonds you together with a common experience.  Your children will never forget the books you read aloud.  Even teens and dads enjoy it!  Pick some time proven classics and get started.  I read a chapter a day to get my school off to a good start. It’s great motivation to help kids get to homeschool on time if they know that ready or not, the story begins right after the flag salute!
#6  Never skip the opportunity to make school fun
Having fun with your mom, even if it entails some challenging learning, is very hard for a child to resist.  Kids are only young once. Enjoy!
{ 0 comments }

Easter: Empty Tomb Visual Aid

Easter is coming and with it the reminder of our Savior’s resurrection. We made this tender visual reminder of the empty tomb years ago and bring it out for use every Easter. The children love to roll back the stone to find the tomb is empty! Even a toddler can understand its meaning.

You can easily make your own Resurrection Morning visual aid with these directions.

You will need:

  • piece of cardboard or poster board
  • plastic or paper bowl
  • small paper plate (or poster board to cut one from)
  • sharp knife or scissors
  • chalk pastels, crayons or markers
  • aluminum foil
  • large brad
  • tape
  • a few sheets of toilet paper

1. If using scrap cardboard, cut a panel approx. 12 x 18″. Glue stick a large piece of construction paper to the front. If using poster board, cut the poster board in half. Draw a hillside scene.

2. Trace lightly around the bowl rim in the hill you have drawn. Cut a hole out of the cardboard 1″ smaller than the bowl rim you traced.

3. Cover the inside of the bowl with aluminum foil, creasing it in the center to create a little shelf across the bowl’s depth. This will resemble the inside of the tomb where Jesus was laid.

4. Lay the bowl on the backside of the display, over the cut opening in the cardboard.  Face the bowl towards the hole and tape it securely in place.

5. Cover the small paper plate with aluminum foil.

6. On the front side of the display, lay the aluminum covered circle over the hole to cover the view of the bowl. Secure in place with a brad on one edge so the circle resembles a stone that can rotate or roll away from the opening.

7. Fold a square of toilet paper to look like the cloths that they wrapped Jesus’s body in that were left in the empty tomb after Jesus was resurrected. Lay these on the “shelf” in the wall of the tomb (bowl). Rotate the stone back in place to hide the bowl so that children may discover for themselves that . . .

“He is not here: for he is risen, as he said.

Come, see the place where the Lord lay.”

—Matthew 28:6

{ 0 comments }

Good-for-You Chocolate Bark

chocolate bark

I’m experimenting with making healthy treats. This chocolate bark has healthy raw cacao, cocoa butter, nuts and your favorite natural sweetener. Yummy!

Raw cacao has higher antioxidants than blueberries. It has lots of other health benefits too. Cacao (rhymes with “ka-pow”!)  Buy it at the health food store or online. Just make sure it is raw.

I am deliriously happy to have chocolate back in my diet!

This is so easy, you can make it in 10 minutes…really.

Good-for-You Chocolate Bark

1/4 cup melted cocoa butter
1 – 2 tablespoons raw cacao powder
1/4 teaspoon vanilla
tiny pinch of Himalayan salt
natural sweetener

Melt cocoa butter in pyrex measuring cup set down in a pan of hot water over very low heat. Remove from heat. Stir in vanilla, salt and sweetener until dissolved.

Use the equivalent of 1 tablespoon of sugar…such as 1 tablespoon of raw honey or xylitol, 10 drops stevia or more, or 1 tablespoon of coconut palm sugar, or a pinch of monk fruit (Lo Han). For a better taste, use a little of each…taste it and adjust.

Then stir in cacao powder. (More cacao powder = more health benefits, but also stronger dark chocolate taste.) Pour liquid mixture onto a piece of parchment paper or wax paper. Fold the corners so it doesn’t run out. Sprinkle heavily with your favorite nuts. I used raw hazelnuts, roasted and salted cashew pieces, and chopped raw almonds. Raw unsweetened coconut flakes would be good too. So would dried fruit like blueberries or cranberries. Some people like hot peppers in their chocolate. Gotta try that someday.

That’s it!

Put it in the freezer for 10 minutes if you can’t wait for it to cool and harden.

P.S.

Health benefits of cacao powder:

Raw cacao powder is a superfood!  It is very high in flavonoid antioxidants, which destroy free radicals that lead to disease. In fact, cacao powder has 20 times the antioxidants of blueberries! These antioxidants have proven to be helpful in preventing cancer, vascular disease, stroke and heart disease.  It is anti-inflammatory too. It helps reduce the bad cholesterol that hardens your arteries. It  lowers your blood pressure. It is a super source of magnesium. Helps suppress appetite which means easier weight loss. Prevents premature aging. Improves insulin resistance (which leads to diabetes). Lots of benefits!

You already probably are aware that chocolate makes us happy!  It contains the mood improver, anandamide, which creates a feeling of euphoria. It also affects seratonin levels, helping women with PMS to feel a sense of well-being. Yep, we knew that… just sayin’.

Why not just use the can of Hershey’s cocoa in your pantry?  Cacao powder is naturally fermented and is its raw form. You can of cocoa powder—the kind you make hot cocoa or brownies with—is roasted, which destroys its health benefits.

Time to make some chocolate bark!


{ 0 comments }

Mom, What Can You Do for America?

I just read the book Unbroken.  It has overwhelmed me. I guess I had believed that all people are God’s children and are inherently good and want to play fair and do right. It took me by such surprise to read of the shocking brutality meted out to Americans in P.O.W. camps in Japan during WWII. On top of this, I just viewed America: Imagine a World Without Her by Dinesh D’Souza which heightened my anxiety for America.

What’s a mother to do?

I cannot fight wars. I can barely vote sensibly. Between the rebuttals and the counter-rebuttal to the rebuttal, I get lost. Aside from voting responsibility, one thing you and I can do is to raise up patriots in our own homes.  We have the responsibility and the power to teach the principles of liberty to our children.  The public schools cannot do it: government funding propagates government agendas.

If you live in a rural community like I do, the teachers themselves are often patriotic and try their best to do what they can to teach love of liberty.  But sooner or later, as the children grow, they will be confronted in school with progressive, modernistic ideas that are anti-American. It is unavoidable. It is in the books assigned, the media, the movies…the attitudes. It is promoted by our own President!  Without a foundation of belief in core principles, a pre-teen or teen may not be able to discern well enough to resist embracing those ideas that will destroy America. The hope of the future is our children…but if the children do not know what protects freedom and what destroys it, how can they grow up to sustain our liberty?

I love Alexis de Tocqueville’s claim that “America is great because America is good…”! Teaching kids to “be good” is a fundamental priority, but we must do more. We must teach them to love freedom, to believe in freedom, to realize how privileged they are to live in a free country and to feel committed to keeping it free!

How?

Start young. Anti-freedom ideas such as entitlement, disrespect for authority figures such as policeman, expectations for free education and government subsidies—these ideas are “caught” rather than taught, so we must make sure our own ideas support freedom! We ourselves are not exempt from believing cultural lies.

Over the years of teaching my children, I have found some tried and true resources that are a huge help.  Although this list of necessity will be brief, it is enough to give your children a foundation.  You can add many other excellent resources to give your children a thorough education in what it means to be an American and to uphold the amazing precepts that made 1776 the beginning of something very precious and wonderful!

Age 3 years and up

Wee Sing America CD and Songbook

Wee Sing America CD and Songbook

Play it in the car, sing along, tell your children the stories of the songs.

Ages 6-12 years

Take Your Hat Off When the Flag Goes By

Take Your Hat Off When the Flag Goes By

This is not only a songbook and picture book, but a good foundational principles-to-music CD program that would do most adults a world of good to know.  Play the songs, learn the lyrics and help your children be knowledgeable about the basic and principles on which our nation is based.


12359

Kids’ Translation of Founding Documents

Explained within a kids’ understanding, the most meaningful documents: The Pledge of Allegience, The Star-Spangled Banner, The Bill of Rights, The Declaration of Independence and the Gettysburg Address.


A Child's Story of America

A Child’s Story of America

A wonderful, faith-building overview of America’s  history. Read it aloud to your children.  Inspiring!

Ages: 12 and up


6981

Learning the Bill of Rights in Minutes

How can you defend your rights if you don’t know them? I learned at least as much as my children did!


12812

What Would the Founding Fathers Think?

Learn to think, to analyze what is happening today in light of what the Founding Fathers would think.


Our Constitution Rocks

Our Constitution Rocks

Learn it, know it, enjoy its provisions for freedom, defend it!


5000 Year Leap, Paperback

The 5000 Year Leap

Principles of freedom propelled our world forward 5,000 years! Everyone enjoys the benefits of freedom.


Constitution Quest Game
Learn the principles of this great document through the fun of a board game. Genius!

See more resources here.

To the bright future of America!
{ 2 comments }

How to Score with After-Christmas Bargains!

IMG_2593You’re sure to spot it…Christmas candy will be stacked up in the 75% off bin before the week is out. You might even find it for 90% off, I know I have. Favorite candy that went into stockings on Christmas eve—candy that we were willing to pay top price for—will be slashed to rock bottom prices.

Since your New Year’s resolution fervor has probably already outlawed sugar, let me explain. Grab some of that Christmas candy at discount prices, and take a look with new eyes!

This is Christmas candy…but just a little sorting makes it into Valentine’s and St. Patrick’s day treats!

IMG_2599

Christmas candy that was fresh a few days ago at Christmas is not going to be stale by February 14. It sits on the store shelves that long, at least.  You can always stash it in your freezer and it will store perfectly well…probably until next Christmas!

Sort it and you’ll have red and white candy to decorate your Valentine’s cookies with or for your kids’ parties. And when St. Patty’s day arrives, you can decorate your corned-beef-and-cabbage dinner table with green candies!

Doesn’t it feel great to save some $ by being clever?

{ 1 comment }

Bethlehem Supper: A Christmas Eve Tradition

bethlehemsupper
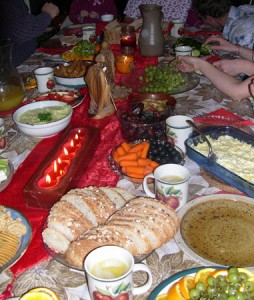
Enjoy a taste of the real night before the Savior was born with this Bethlehem Supper. It is quick and easy to prepare, a boon for mom when things can otherwise be quite hectic. The simple foods are a refreshing taste change from the rich holiday foods. Eating what Joseph and Mary may have eaten transports us to a different time and experience, and keeps us more mindful of our Savior’s birth. It also makes a meaningful prelude to reading the chapter in Luke or re-enacting the nativity.

You can create a very simple supper or a more elaborate experience. Here’s some things we have done:

*Play instrumental folk music from Israel in the background.

*Dress up in robes and sandals, pretending you are travelers at an inn in Bethlehem.

*Set the scene with palm fronds, oil lamps, simple pottery or wooden dishes, small earthtone candles (no electric lights).

*Have guests wash their hands in a large bowl with a pitcher of water before eating.

*Sit on the floor on blankets or pillows and use a low table for the food. If you are very courageous or don’t have little ones, you can spread the tablecloth right on the floor.

At the time Jesus was born, the large meal of the day may have included wheat or barley bread, cheese, vegetables, fruits, beans, lentils and eggs. Fish or chicken was the most common meat. Beef and lamb were served only on special occasions (the fatted calf at the return of the prodigal son). Pork and seafoods such as crab, lobster or shrimp were forbidden. Food was boiled in a big pot seasoned with onions, garlic, cumin, coriander, mint, dill or mustard, and salt. Sweets included wild honey, dates and grapes. Food was eaten by dipping fingers into a common bowl.

Here are some menu ideas to choose from:

Flatbread
Hummus (recipe below)
Fish sticks
Goat cheese (called “feta”)
Olives
Raw veggie tray with dip
Cheese and cracker platter
Pomegranates
Braided Jewish bread
Grape juice or grapes
Tomato and cucumber salad
Soup
Dates and figs (can twist a few in gold tissue paper and put by each place setting as a treat)
Orange slices

Enjoy!

Make your own, try these easy recipes:

Hummus—Middle Eastern Sandwich Spread

2 cups cooked garbanzo beans, or 1 can (15 oz.) drained (reserve liquid)
1 tablespoon fresh parsley
1/2 small clove of garlic
Dash of freshly ground pepper
2 tablespoons lemon juice
1 tablespoon olive oil
1 teaspoon sesame seeds

Put all ingredients into a blender or food processor and blend until smooth, adding a bit of cooking liquid (or liquid from canned beans) if needed to make a thick dip. Spread on pita bread, crackers, or use as a dip for vegetables. Serves 8.

To make a Middle Eastern sandwich, open a half pita and spread hummus inside. Then add chopped tomatoes, cucumbers, onions if you like, and drizzle with yogurt and cumin. Very delicious, healthy and authentic.

Pita Bread

Easy to make, magical to watch puff up in the oven, and delicious to serve with hummus, above.

1 teaspoon yeast
1/2 cups warm water
1/2 teaspoon salt 1 1/2 cup white wheat flour or whole wheat)

Sesame seeds

Put warm water in a mixing bowl with yeast. Stir in salt and enough flour to make a stiff dough. This may be a bit more or less. Knead dough until smooth. Cover and let rise. Break off a walnut sized ball of dough and roll out on a floured surface until 1/4″ thickness, or pat them quite thin patty-cake style. When pita is formed, you may press it onto a plate of sesame seeds if you like. Lay gently on cookie sheet, without touching. To insure that they bubble up, forming a pocket, preheat hot oven before putting pitas in to bake. Bake at 450° for about 8 minutes. They should not brown or get crisp, but should still be soft. Makes 6 pitas.

(recipes from Hopkins’ Healthy Home Cooking)

{ 2 comments }

Make An Infinity Scarf in 7 Minutes!


My daughter Julianna is expecting! A scarf is a great way to dress up maternity outfits.

My daughter Julianna is expecting! A scarf is a great way to dress up maternity outfits.

Here’s a very simple project that you can make in 7 minutes! It would make a great gift. It is also fun to sew up a few to jazz up your clothes for the holidays.  We made ours by using fabric scraps, and also recycling an old skirt.  All you need is a piece of fabric approximately 36″ long by 20″ wide.  I say approximately because we used a scrap that was much wider on one end than the other, and it still worked fine.

If you plan on wearing it indoors to give color and spice to your clothes, one loop works great. It is lightweight and doesn’t get warm.  If you are going to wear your scarf with a coat or to keep warm, two loops is fun. Experiment with a piece of fabric, looping it around your neck until it looks good—then measure the length that works best on you.

Let’s do it!

1. Cut your fabric into an approximate rectangle that is 20″ wide.  It should be about 36″ long for a one-loop scarf for adults, and about 60″ to 70″ for a two-loop scarf. Don’t stress if the fabric piece is not even or perfect—it will still work out well!

2. Fold your fabric right sides together long-wise and stitch up the side, making a long tube with an open top and bottom.

An "infinity" scarf is just a circle of fabric.

An “infinity” scarf is just a circle of fabric.

3. Reach into the tube, grasping the bottom edge and pull it through just until it lines up with the top raw edge of the tube, right sides together. Match the seam and pin.

4. Pin the raw edges together until you have pinned the entire circular raw edge of the tube together. Now stitch those raw edges together leaving a 3″ opening.

(If you get stumped on this last step, watch this tutorial video I found which shows this step very well, right at the 2:00 minute point in the video.)

My daughter Emily made a longer scarf that can be looped around the neck twice.

My daughter Emily made a longer scarf that can be looped around the neck twice.

5. Put your hand into the 3″ opening and pull the scarf through the opening, which will turn it right side out so the seams go to the inside.  Stitch the opening closed with a tiny zig-zag stitch close to the edge.

That’s it!  Put it on and feel fashionable!

{ 2 comments }

Happy Times…Again

memory leavesIf happy times were sold in a store, we would pile our carts high, buying as many as we could possibly afford!  We enjoy the “good times” and we re-live them over and over again with the happy memories they provide.

This year for Thanksgiving, instead of writing down what we are thankful for to increase our gratitude, we decided to focus on our happy memories of this past year. Everybody has unhappy, scary or bad times.  And those can often be the most dominant memories.  We tend to focus on the car accident rather than the other 364 days of safe driving around incident-free.  Research has shown that whatever memories we choose to review, both in our minds and by retelling them to others, become most influential in our lives.  Memories tend to pop into our minds and it doesn’t always feel like a choice, but resisting the tendency to review bad memories can ease their trauma and their power to make us unhappy.

So, I asked my family to write down their happy memories of this past year on some paper leaves that we taped up to decorate for Thanksgiving. Sometimes it takes searching to remember the joy in our ordinary days. A beautiful sunset, a fun family campout, the raspberry bushes covered in sweet, sun-warmed gems, a visit to a neighbor, a little hike to see the brilliant autumn leaves,  an interesting book read…these pleasant things make life more joyful and beg to be celebrated with gratitude!

Don’t forget the relief of things that were most certain to happen but didn’t: they make happy memories too!

    • the potential speeding ticket that ended up just being a warning instead
    • the flu you didn’t catch even though everyone around you had it
    • the lost camera that turned up unexpectedly
    • the eyebrow-raising “A” on a test you thought you failed

Bad things that didn’t happen give us a big happy feeling too!

I got some interesting insights into my family members when I read their “leaves” and was sometimes surprised with what made a happy memories for each of them.  A carnival dunk tank experience I remembered with fright made a thrilling memory for my son. We all view life so differently. Knowing the little things that makes each other happy helps you to be able to orchestrate more happy times together.

Celebrate gratitude by choosing to focus on your happy memories!

{ 1 comment }

hot-fudge-sauceIt’s summer time, ice cream time…and even if you don’t like to eat sugar, you no doubt have enjoyed ice cream!  It’s part of being an American, isn’t it?

Here’s a great, tried-and-true recipe for hot fudge: the thick, creamy, milk-chocolate-delicious fudge sauce that cost $3.99 or more at the grocery store. This recipe makes nearly two jars in 5 minutes, really!

No high fructose corn syrup, no trans fats, no modified food starch!  Now…if I can just find a way to replace the sugar…

Hot Fudge Sauce

  • 2 cups sugar
  • 1/4 cup cocoa
  • 1/4 cup flour (whole wheat or white, either is fine)
  • 1/4 cup butter
  • 1 large can (12 oz.) evaporated milk

Put all ingredients into a saucepan and whisk over low heat until well blended.  Turn up heat and boil for 1 minute, stirring occasionally. If you take it off the heat after about a minute, you will have the kind of Hershey’s type chocolate syrup that stirs easily  into milk.  Boil for approx. 3 minutes and you’ll have hot fudge sauce.  Boil for 4-5 minutes and you’ll have the thick kind of fudge that you have to spoon out of the jar.

Enjoy!


{ 1 comment }

A Nasty Word . . . and How to Cure Yourself


swept floorBUT
: a nasty, nasty word.

Your English essay was really good, BUT you keep making that same mistake with commas.

You washed the car!  BUT why didn’t you vacuum inside?

Wow!  What an excellent report card!  BUT why this “C”?

So glad you swept the floor, BUT you missed a spot here.

“But” invalidates our praise and compliments.  It stings the eager listener, turning a smile into disappointment.

How to cure yourself:

Put a period on your praise. Once you start saying something nice—noticing someone’s effort—put a period in the sentence right before the “but” pops out.  Just stop.  Don’t say it.  Bite your tongue. If your family is used to hearing a negative ouch on the end of every compliment from you, they are going to look at you in wonder…waiting for you to finish your sentence.  It’s kinda fun to watch them and confused and quite happy that you’ve stopped just in the nick of time!

Write yourself a note. Parents feel compelled to make sure children learn all that they need to learn, including how to write an essay with proper comma placement.  Seeing the commas misplaced jogs your memory…”oh, I really need to teach her how to use commas correctly!” Difficult as it is, do not mention it.  Jot yourself a private note to work on commas another day, when this paper is out of her mind. Let the good English paper be her happy success today!

Stop doing it to yourself.  Upbeat treatment of others starts with how you treat yourself. I got a great idea to remodel my bathroom, so I thought up a theme,  bought new towels, and eagerly ripped the wallpaper border off.  Well, part of it…the part I could easily reach.  That was weeks ago. Maybe longer.  It is easy to look at it and say to myself, “I’m enthused to remodel my bathroom, BUT I sure can’t finish a project.”  I am going to reword that right here and now: “It’s amazing that I got this far, considering all that is going on in my life!  Bravo!”

I’m on a campaign to banish “but” from my vocabulary forever….I know it will make my loved ones happier!


{ 5 comments }